In my article Advent Calendars for France Lovers – 10 Ideas to Buy or Make Yourself, I already gave you a quick look at the two DIY advent calendars I created. In this post, I’d like to walk you through the process step by step so you can design your own calendar exactly the way you want it.
I’ll show you which materials I used, how I put everything together, what the calendars cost me, and how long they took to make. Both of my advent calendars follow a French theme — fitting for my blog, of course — but you can interpret the idea however you like and simply use my versions as inspiration. Either way, I hope you have fun crafting!
This article contains affiliate links. If you book something through them, I will receive a small commission at no extra cost to you. It is a wonderful way to support my blog; thank you.

Calendar No. 1: Personalizing Your Advent Calendar with Stickers
The first calendar is made from larger brown paper bags (27 × 15 cm), which I decorated with stickers. I used numbered wooden clothespins to close each bag, simple and cute, and you instantly know which bag belongs to which day.
Materials You’ll Need
Paper bags – set of 24 from Flying Tiger Copenhagen, approx. €4 (similar here)
Wooden number clips – also from Flying Tiger Copenhagen, approx. €3.50
Gift tags – 3 sets of 8 pieces, around €2 each
Decorative ribbon – about €2 for the bows
Sticker set from Baker Ross – approx. €8 (available here)
The sticker set from Baker Ross includes 150 stickers, and I actually used most of them. They stick really well, are easy to work with, and thanks to the wide variety of designs, you can create charming little scenes in no time. I intentionally didn’t make this advent calendar overly Christmassy, the focus was more on the French theme.
If you enjoy drawing or have a more artistic touch, you can absolutely add more detailed or festive backgrounds.
Once all the bags were decorated, I filled them and folded the top edge down. I folded the gift tags as well and attached them using the clothespins. For an extra little festive detail, I tied small bows and glued them onto the tags. And if (like me) you’re not exactly a master at tying bows: YouTube has great tutorials using a simple fork as a helper. It works surprisingly well! And after 24 bows, you’ll definitely be an expert. Promise!
 – Edited")
In total, I spent around €25 on this calendar, plus whatever you choose for the fillers, of course. The stickers were the most expensive part, so depending on what you use, your version could turn out much cheaper. And if you already have gift tags or decorative ribbon at home, you can save a bit more.
All in all, the project took me about two hours.

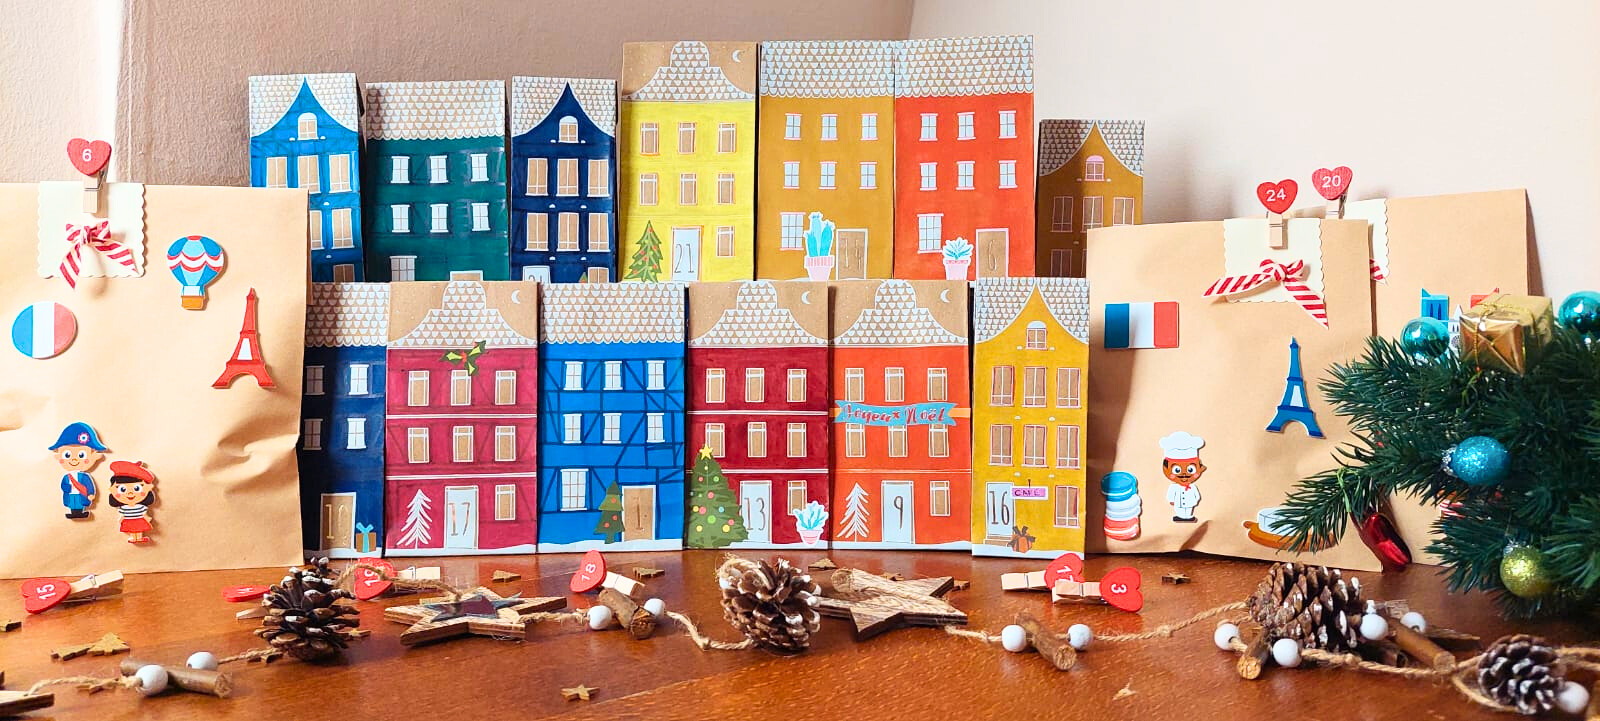
Calendar No. 2: Advent Calendar Made from French-Style Mini Houses
For the second calendar, I also used a pre-made bag set, this time a charming little house set from Maisons du Monde. I decorated half of the houses in the style of my adopted hometown, Nice, and turned the other half into colorful half-timbered houses inspired by the Alsace region. Since the bags were already numbered, I didn’t need any additional materials. The sizes vary slightly; one of the houses, for example, measures around 15 × 8 cm.

Materials You’ll Need
Advent calendar house set from Maisons du Monde, approx. €10 (similar here)
Paints for decorating – I used watercolors
Felt-tip pens
Stickers, approx. €5
Here on the French Riviera, it’s typical for houses to be painted in warm earth tones — ochre, terracotta, sienna, and shades of clay and sand — while the shutters stand out in contrasting colors. I gave my little French Riviera houses exactly this look and then added a few cacti and some subtle Christmas-themed stickers as decoration.
For the Alsace houses, I went with slightly more muted colors and added half-timbered beams. I made sure the “beams” weren’t too straight or too evenly placed, just like in real Alsatian villages, where the charm often comes from things being a little imperfect. A few Christmas stickers on top, and the second half of my tiny village was complete.
Since I only had to buy the house set and the stickers, this calendar came to about €15. I already had paints, brushes, and pens at home.
Painting the houses took quite a bit of time (about six hours), but I made myself comfortable and watched some videos while working. It turned into a wonderfully relaxed November afternoon of crafting.

Now all that’s missing is the filling! You’ll find plenty of ideas in my other article, which I’ve linked for you again here. I usually keep the fillers fairly simple and add something a bit more special only for St. Nicholas Day and Christmas Eve.
I hope you’re now just as inspired to start crafting as I was. Make yourself comfortable, grab your scissors and glue and enjoy creating your own advent calendar!
Wishing you a wonderful, peaceful, and creative Advent season.
Francesca

- All photos: Francesca